Free image upscaler: make a photo 2× bigger
Make a photo 2× bigger, with crisper edges than a plain enlargement. Free, 2 photos a day, no sign-up.
No sign-up
Drag your image here, or click to browse
JPG · PNG · WebP up to 10MB
How to upscale an image 2×
It took 8-13 seconds a photo in our tests (8.6 seconds for the run on this page).
- Upload the photo: drag in a JPG, PNG or WebP file up to 10 MB, or click to choose one. An iPhone HEIC photo needs converting to JPG first, with the image converter (https://genlabs.in.th/en/tools/image-converter).
- There is no mode to pick: this page has already set AI Enhance with 2× for you.
- Press "Upscale 2×", then press "Download". The file is a PNG.
This page runs the same tool as the photo enhancer page, with AI Enhance and 2× switched on. To sharpen a blurry photo without making it bigger, use that page: https://genlabs.in.th/en/tools/enhance-photo
How is a 2× upscale different from a plain enlargement?
The edges are crisper than a plain enlargement, but on average the result is farther from the real picture. We can say this because we can compare with the real picture. We took a picture made with GenLabs (a 1086 × 1448 pixel JPG, 665 KB) and halved it ourselves to a small 543 × 724 photo (a 217 KB JPG). Then we ran 2× once. We compared the result with the real picture. We also compared it with the same small photo enlarged the plain way: a resize like an image editor does, which adds no detail. Tested 30 September 2026 on the GenLabs development site. One photo, one run.
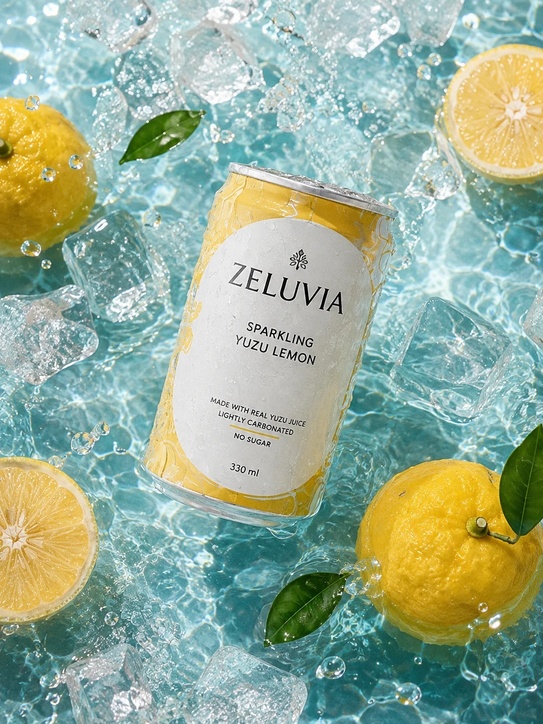
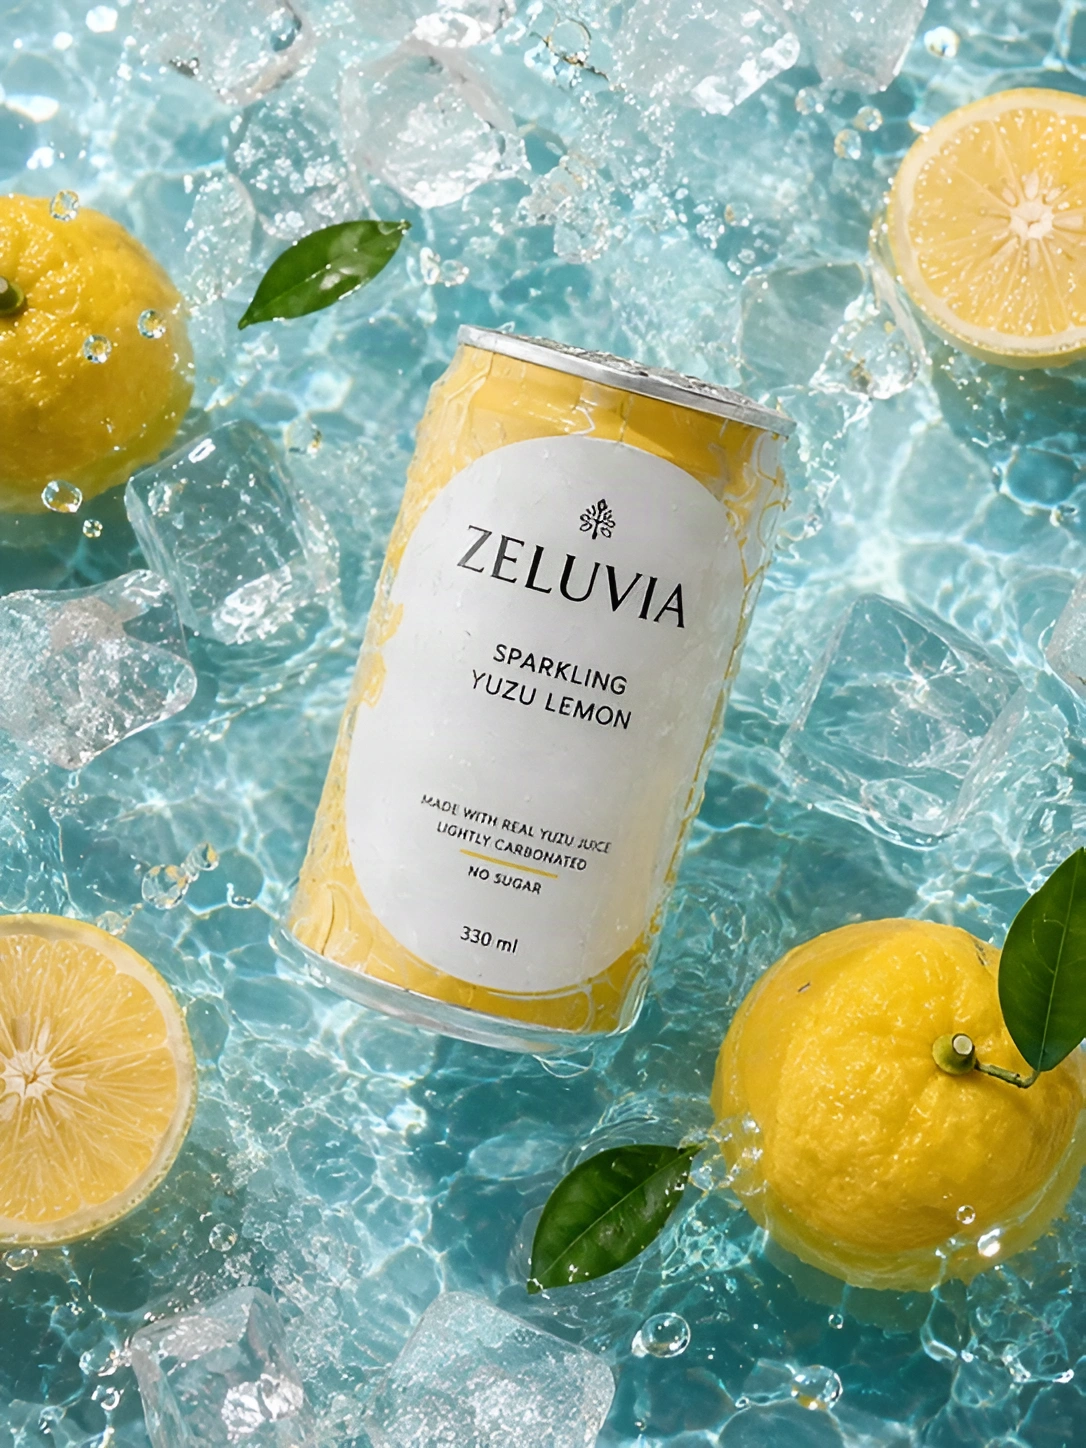
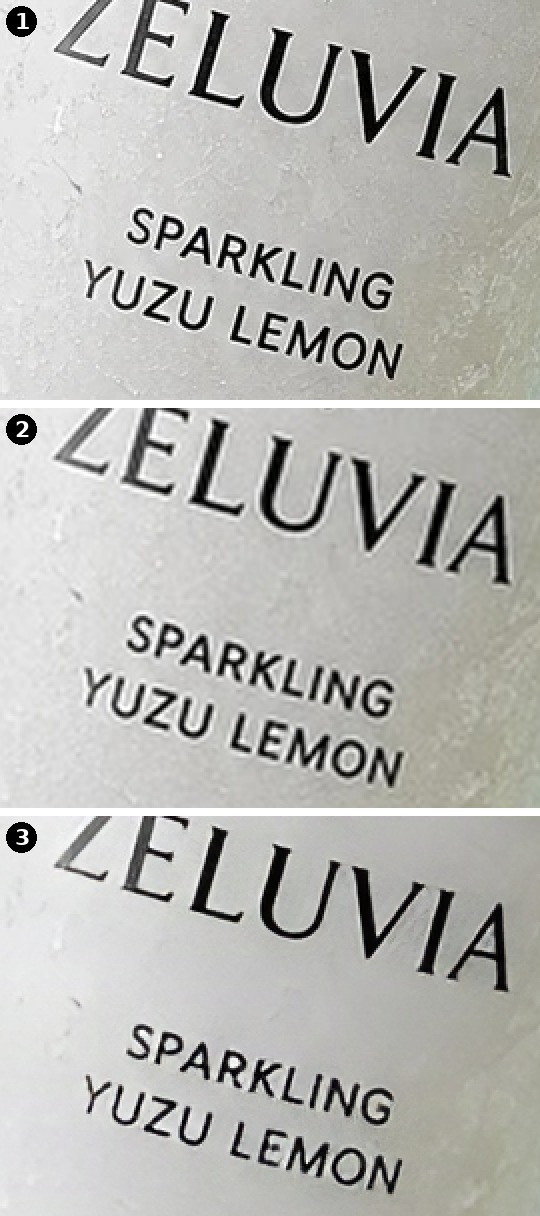
| 1 The real picture | 2 Plain enlargement | 3 This tool's 2× | |
|---|---|---|---|
| Pixel size | 1086 × 1448 | 1086 × 1448 | 1086 × 1448 |
| Edge sharpness score (higher = crisper) | 685 | 168 | 287 |
| Average gap from the real picture per pixel, out of 255 (lower = closer) | 0 | 4.4 | 6.0 |
| Print about 22 and 9 pixels tall in the small photo | Reads right | Reads right, blurry | Reads right, crisper |
| Print about 5 pixels tall in the small photo | Reads right | Reads right, blurry | Some letters changed shape |
Both scores were worked out by a program, only to compare these three pictures. The sharpness score measures how hard the edges are in the grey picture. The gap is the average distance of each pixel's colour from the real picture (0-255).
- Crisper edges than a plain enlargement: a sharpness score of 287 against 168, but still below the real picture's 685.
- Big and medium print came out crisp and right: the brand name on the label and the line SPARKLING YUZU LEMON read the same and have crisper edges than the plain enlargement.
- Farther from the real picture: the tool's average gap is 6.0 and the plain enlargement's is 4.4. The picture looks crisper because the edges are harder, but the tool did not bring back what the small photo had lost.
- Fine texture came out smoother than the real picture: the fine grain of the label surface is mostly gone and the pitted skin of the yuzu is much fainter, so the picture looks retouched.
Will small print on a label still read the same?
It depends on how small the print is in the photo you put in. In our test, print about 9 pixels tall and up read the same. Print about 5 pixels tall had some letters change shape. The three smallest lines on the label are LIGHTLY CARBONATED, MADE WITH REAL YUZU JUICE and NO SUGAR (about 5-6 pixels tall in the small photo). We compared them with the real picture letter by letter:
- LIGHTLY: the first two letters, L and I, ran together into one letter that looks like a U, so it reads UGHTLY.
- CARBONATED: the last letter D came out looking like an O, and the E before it is off too, so it reads CARBONATEO.
- JUICE: the I is gone, so it reads JUCE.
- NO SUGAR (about 5-6 pixels tall) and 330 ml (about 7 pixels tall) read the same. Print of the same height came out right on one line and wrong on another, so no single height works as a sure dividing line. The plain enlargement of the same small photo is blurry, but all three lines still read right.
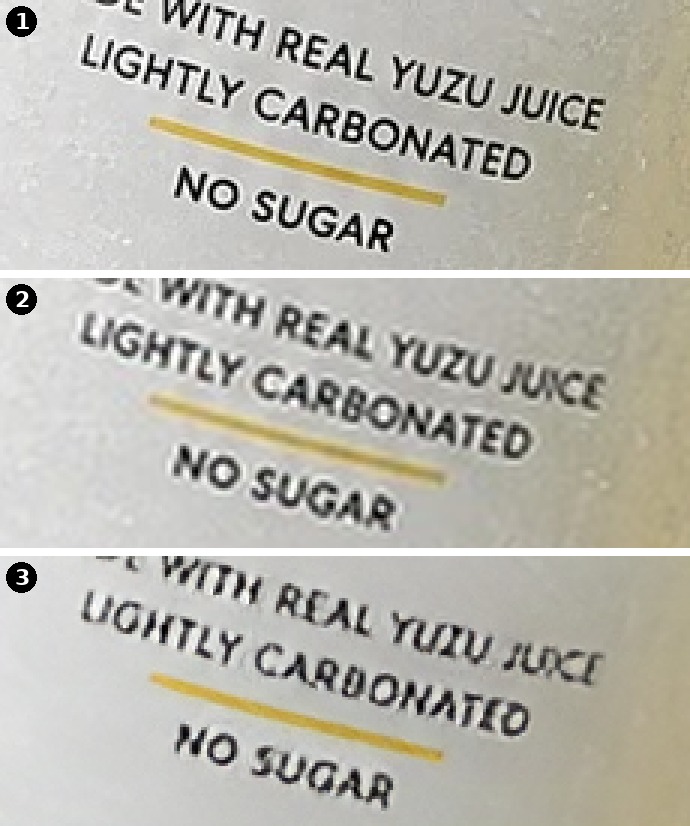
Check every photo before you use it: open the result at 100% and compare it with the real product letter by letter. Look hardest at the smallest line, the numbers and any Thai text (vowels and tone marks). We have one photo and one run, so the 9 and 5 pixel figures belong to this photo. They are not a rule for every photo. If the label matters and the print is too small, use the original or shoot again (how to shoot it sharp: https://genlabs.in.th/en/blog/how-to-take-product-photos-phone).
The photo enhancer page has another test, on a 1080 × 1920 pixel video frame: https://genlabs.in.th/en/tools/enhance-photo
Which photos to upscale, and which to use as they are or reshoot
Upscale a small photo when the print on the product is not too small. When small print must read exactly right, use the original or shoot again.
| Upscale it | Use the original or reshoot |
|---|---|
| A small product photo you want bigger for a post or a product page, where the print on the product is big enough (in our test, print about 9 pixels tall and up stayed right) | A label with very small print, such as ingredients, volume or an expiry date (in our test, some letters of print about 5 pixels tall came out wrong) |
| A PNG with a transparent background (tested, see question 5) | A photo where real texture matters, such as fruit skin or the grain of a label (in our test the result is smoother than the real picture) |
Not tested on this page: real phone photos, faces, screenshots and scanned documents. Check the result before you use it. The photo enhancer page has a face test on a video frame.
How big is the file, and can I upload it to a shop?
The file is a PNG and it is big. In our test a 217 KB JPG became a 3.95 MB PNG, 18.7 times bigger (the real picture at the same pixel size is a 665 KB JPG). Your shop may set a lower file limit. If so, convert the file to JPG with the image converter (https://genlabs.in.th/en/tools/image-converter). Then shrink it with the image compressor (https://genlabs.in.th/en/tools/image-compressor). Each platform's limits are in the image size guide: https://genlabs.in.th/en/blog/product-image-sizes-all-platforms-2026 The order we suggest: upscale first, then cut out the background (https://genlabs.in.th/en/tools/background-remover), resize (https://genlabs.in.th/en/tools/image-resizer) and shrink the file, with the file size last, because the PNG you get is bigger.
What this tool does not do
- It has no 4K, 4× or 8× to pick. It has 2× only, which makes the width and the height twice as large (4 times the pixels in all: our test photo went from 393,132 pixels to 1,572,528).
- It does not bring back detail that is gone: print that is too small in the photo you put in can change shape, and in our test fine texture came out smoother.
- It does not take HEIC files or files over 10 MB, and it upscales one photo at a time.
- It is free for 2 AI photos a day, with no sign-up. AI Enhance sends the photo to our AI provider to process. GenLabs does not store the result.
- We did not test upscaling a result a second time.
A bigger photo is still the photo you took. Next, make the product photo help you sell.
Want product images, ads and posts that are ready for your shop and page, not just the same photo made bigger? Send one product photo from your phone to GenLabs and pick a direction. GenLabs writes the prompts and makes the images: a set in 2 minutes, and you write no prompts yourself. Then you can schedule posts to TikTok, Instagram and Facebook from one place. See what GenLabs does on the product page: https://genlabs.in.th/en/product
Try it on your own product photoOther free tools for product photos
Frequently Asked Questions
How do I upscale an image for free, and do I need to sign up?
No sign-up. Open this page, drag in a JPG, PNG or WebP file up to 10 MB, press "Upscale 2×", and download. AI upscaling is free for 2 photos a day. In our tests it took 8-13 seconds a photo (8.6 seconds for the run on this page). AI Enhance sends the photo to our AI provider to process. GenLabs does not store the result.
Does the picture fall apart when I upscale it, and is it really sharper?
In our test the edges of the big letters were crisp and smooth, with no stair steps. They were crisper than the plain enlargement (a sharpness score of 287 against 168). On average it is farther from the real picture (an average gap of 6.0 against 4.4, out of 255). Print about 5 pixels tall had some letters change shape, and fine texture came out smoother than the real picture. One photo, one run.
Will the text on a product label change?
It depends on how tall the print is in the photo you put in. In our test the brand name (about 22 pixels tall) and the product name (about 9 pixels tall) read the same. Some lines about 5 pixels tall changed: LIGHTLY read UGHTLY, CARBONATED read CARBONATEO and JUICE read JUCE. Check every letter against the real product before you use it. If the label matters and the print is too small, use the original or shoot again.
Can I make a 4K picture, or upscale 4× or 8×?
No. This tool has 2× only, which makes the width and the height twice as large. A 543 × 724 pixel photo came back 1086 × 1448, which is not 4K. There is no 4× or 8× option. We did not test upscaling a result a second time, and each run uses 1 of your 2 free photos for the day.
Does a PNG with a transparent background stay transparent?
Yes. In our test (29 September 2026) we put in a 600 × 600 pixel PNG with a transparent background that we made ourselves. It came back 1200 × 1200 with the same transparent area: 64.8% of the pixels were fully transparent, against 64.9% in the file we put in.
How big is the file, and can I upload it to a shop?
Big. In our test a 217 KB JPG became a 3.95 MB PNG. If that is over your shop's limit, convert it to JPG with the image converter (https://genlabs.in.th/en/tools/image-converter). Then shrink it with the image compressor (https://genlabs.in.th/en/tools/image-compressor). Each platform's limits are in the image size guide (https://genlabs.in.th/en/blog/product-image-sizes-all-platforms-2026).